Guest Post by Aleks Salkin
“Gymnasts are NOT totally, completely, irretrievably ripped to **#!@ shreds” said no one ever. Which is to say that pretty much everyone can agree that male gymnasts sport some pretty eye-popping, jealousy-inducing physiques, and guess what? It’s not because they’re better, smarter, or taking better supplements than you – it’s because the exercises they do support their Greek god bods better than any old school sculptor with a hammer and chisel could. Specifically, I’m talking about straight-arm strength exercises.
What are straight-arm strength exercises? And why do they have such a big impact on your strength?
Straight-arm strength exercises are just as they sound – exercises that require you to keep your arms straight throughout the duration of the set.
More specifically, they typically require your entire body to stay frozen in an awkward, gravity-defying position, meaning that even seemingly unrelated body parts take an isometric thrashing. As such, your muscles are kept under tension at some very odd and awkward positions for some time, encouraging them to fill out and develop despite their perhaps otherwise insouciant disregard for your intentions to build a statuesque figure. In fact, gymnastics coach and author of the book Building The Gymnastic Body Chris Sommer has said that gymnasts owe their eye-popping pipes more than anything to such exercises as planches and crosses and not the familiar weighted exercises that you love so much. On top of it all, to say it leads to an outstanding, muscle-building workout is an understatement akin to saying that the Arctic is chilly.
The aforementioned exercises (planches, crosses) are going to be out of your reach if you’re a mere mortal. Sorry. BUT, the good news is that there are a few that you can start progressing toward right away if you’re ready to do some work and get a jaw-dropping physique. Best yet, it doesn’t have to get in the way of your current programming, and due to the immense amounts of scapular stability you’ll gain, you are likely to start seeing some big gains in your favorite upper body exercises.
The following is an approach to ease you into practicing these awesome moves. You’ll do it just two days a week to start out, but you’ll be amazed at what those two days will do for you in terms of strength development. And naturally if you want you can do 3 or 4, though you’ll want to limit other training accordingly to handle the workload. I’d recommend a few weighted pullups and dips of a moderate weight at the end of a session (or handstand pushups. Or heavy rows. Pick your poison, just take a lower dose of it). And, of course, squat and deadlift/swing heavy, otherwise you’ll look like an upside down pair with toothpicks for legs, and we’ll all point and laugh behind your chiseled barn-door back.
Pair #1: Front lever and back lever progressions
If these were all you did in the straight-arm strength arena, you could still be awesome. But there’s a lot of other fun stuff to play with, so this won’t be all you’ll do, but because they’re more demanding than other moves, they’ll be the first thing you do.
Start off by finding how long you can hold each appropriate progression (“appropriate” = appropriate for your current level). Generally the flat back tuck version of each is best for most intermediate trainees. Beginners will want to move their knees closer to their chests.
Here’s an example program
A1) Front lever progression – 5 seconds
A2) Back lever progression – 5 seconds
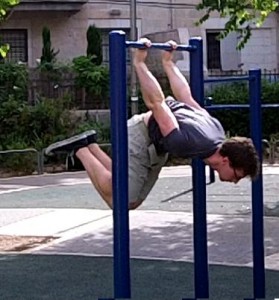
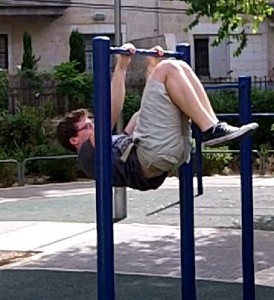 Flat Back Tuck Front Lever – bring your knees closer to your chest for a less challenging version and extend one leg at a time for a harder version.
Tuck back lever. Same rule applies for progression/regression. Side note: A front lever works your back and a back lever works your front. No, I don’t get that either.
Repeat 5 times to start with, and work your way up to 10 total sets. For your next course…
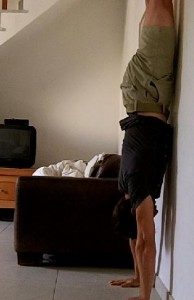
L-sit + handstand. You’ll build some badass abs and boulder shoulders – a must if you wanna look like a stud/studette on a beach. For your handstand, go with the hollow version, meaning face the wall rather than back to wall. This requires an ability to roll out of it when it starts going south, lest you take your trips on a quick stroll through Snap City, so if you can’t roll out of a handstand yet, stick with the back to wall version for now.
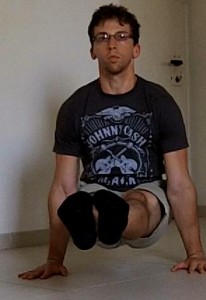
Because handstands tend to be rough on the wrists, the next move (the L-sit) can either be done on a set of parallette or kettlebell handles OR on the fists, both of which should spare your wrists a bit.
B1) Handstand – 5 seconds
B2) L-sit – 5 seconds
Hollow position handstand. Tip: Shrug your shoulders a bit. Your shoulders will show their thanks by not hurting AND building speed bump-like traps.
The L-sit. If you can’t figure out how it got its name, please slam your face in a **#!@ door.
Though these are simpler and more achievable moves than the front and back lever, don’t be too ambitious about the time you spend in them – the front and back lever will smoke you harder, particularly your abs, so be conservative.
Again, start with 5 sets, work your way up to 10, and you’ll have options on how to progress from there by the end of the article.
Bonus! Because the above moves require you to remain still as a sniper, it’s nice to throw in a straight arm exercise that will allow you to move a little bit. There are a couple of options, but my vote goes to the pullover as the ultimate, particularly considering people curiously just don’t do them anymore. I don’t know why.
C1) Pullover – 3×3
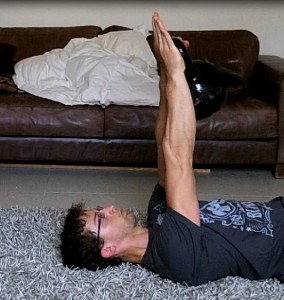 Pullover step 1: notice the hand position. Thumbs fed through the kettlebell handle.
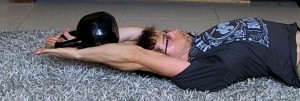 Pullover Step 2: Control this or just do the negatives until you can.
Grab an appropriately sized kettlebell (be conservative) and do 3×3 or 3×5 if you’re ambitious. Start at the top position, as if you’re doing a close-grip bench press (I know you’ve done them) and with straight arms, lower as far as you can. Due to the close-grip nature of the move, you may find your shoulders wanna shrug a bit as you go down. It probably won’t kill you, but it may be too much for some people’s shoulders, so proceed with caution. If you have access to a barbell (an EZ curl bar would do) it might be better to go with something that will provide you with a wider grip.
And that’s it! Do this twice a week and watch as your strength soars higher and your muscles get stronger and denser. Doesn’t sound possible, but 6 to 8 weeks worth of dedicated practice with a steady increase either in time under tension (add seconds to each set) or a reduction in rest between sets should change your mind. Increase the difficulty conservatively by straightening one leg in your front/back levers and adding time in your handstands and L-sits or add weight in your pullovers. The possibilities are endless, and your ridiculous upper body strength is only getting started. Have fun.
Aleks Salkin is an StrongFirst-certified kettlebell instructor (SFG), StrongFirst-certified bodyweight Instructor (SFB), and an Original Strength Specialist. He grew up scrawny, unathletic, weak, and goofy, until he was exposed to kettlebells and the teachings and methodology of Pavel in his early 20s. He is currently based out of Jerusalem, Israel and spends his time spreading the word of StrongFirst and calisthenics, and regularly writes about strength and health both on his website and as a guest author on other websites. Find him online at http://www.alekssalkin.com.
Something i would never have thought about….. in terms of building strength. Great work.
Great excercises. But, why the hollow handstand facing the wall insteadmthe more advanced back to the wall ?