Have you ever experienced lower back strain/pain after a kettlebell session?
Are you new to kettlebell training?
Has it been awhile since you’ve considered your technique?
Could you afford to spend a few minutes taking inventory of your hinge pattern?
Pat and I instructed a kettlebell workshop the other day. It was a beautiful, wonderful thing, introducing those bright-eyed prospects to the world of kettlebell training.
Obviously, my greatest fear was that an attendee would wake up the next morning with terrible back pain, never to become of convert to the kettlebell culture.
In hindsight, I would venture to say that no attendees suffered this fate. [If you were there and beg to differ…I’ll call the charity and try to get you a refund.]
Although I would be remiss not to credit both their instincts and their effort, I think it may also have to do with the careful progression through which we guide our beginners, along with these 4 tips that we use to cue the proper hinge pattern.
After all, there’s nothing like a gym full of beginners to reveal the most common mistakes of the kettlebell swing, and to serve as a reminder how crucial it is to re-assess form from time-to-time.
That’s why I felt compelled to write today’s blog post. I hope that, regardless of your status as a beginner or a veteran, you take a moment to ensure minimal change of injury and maximal effectiveness.
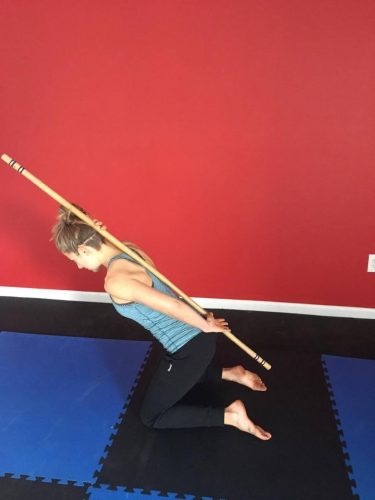
Step 1 is to start with nothing but yourself and a stick/rod of some sort. (Like a detached broom handle or a PVC pipe.)
Step 2 is to get into a kneeling position, situated stably on knees with feet behind, in line, tops of feet down.
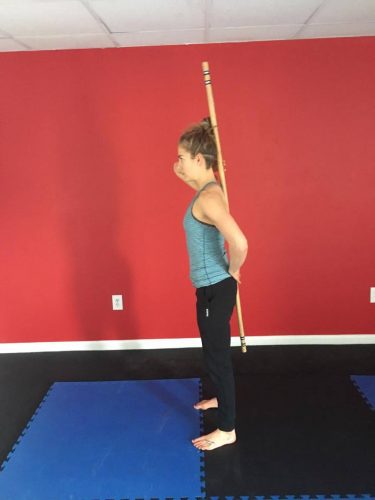
Step 3 is to align yourself so that your fingertips are supporting the stick below your tailbone and in the concave of the back of your neck.
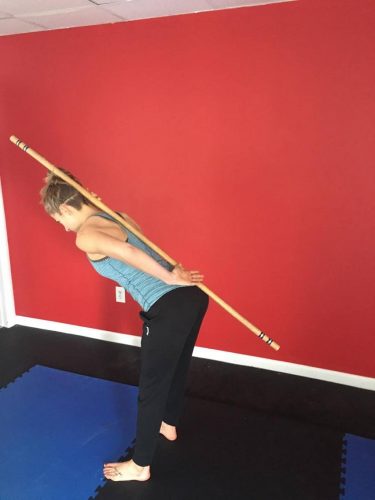
Step 4 is to hinge forward, keeping your back neutral such that the stick remains in contact with the spot between your shoulder blades, your tailbone, and, preferably, your head. Do NOT hold the stick against this points so as to force it. Focus on using your body to balance it.


Step 5 is to practice this several times, getting a feel for any specific tendencies you have to slip out of alignment, and becoming confident with your range of motion. Do not hinge further than proper alignment allows.
Step 6 is to repeat this whole ordeal from the standing position, assuming the same stance you would use for your swing.

Now, for Step 7.
Step 7 is to video yourself swinging. You simply cannot assess your swing effectively using a mirror. Of course it’s awkward, but you need not share it on social media. Record it, review it, assess it; repeat, and delete.
Consider these questions as you watch yourself perform the kettlebell swing. (They are written so as to be easily asked also while actively performing the movement.)
- Is your kettlebell clearing “too low”? It seems a reasonable, self-preserving tendency to swing the bell so that it clears between the legs through the most wide open space. Avoid this pitfall! Don’t be a chicken! Instead, think about your hands grazing your very, very upper thigh.
- Is your kettlebell swing “too short”? It is common for beginner swingers to stop the bell short of its natural arc rather than allowing the bell to carry on through the legs, nearly wrapping up to hit the bum.
- Is your kettlebell swing “too squatty”? There should be zero upward propulsion with the swing. Hips back, like your are trying to touch the wall with your butt, then hips forward with all your might, as if you are trying to broad jump to China (but without your feet budging from their firmly planted position). Knees should be soft, with the degree of bend varying based on mobility. Refer to your stick-assessed hinge pattern!
- Is your kettlebell swing “too Michael Phelps-y”? (Do you look like a diver at the peak of your swing?) By this, I mean, is your upper body forward, rounded, head tucked down between your shoulders, shoulders near your ears? Remember, you are broad-jumping, not diving! Fix this by squeezing imaginary cloths in your arm pits. There should be tension from your grip on the handle of the bell and through your lats in order to keep your back in alignment.
If you try this out and still aren’t feeling confident, be sure you are following Pat on Facebook for lots of videos that will demonstrate proper technique! Also, if you join Pat’s email list, you will get a boatload of helpful emails with tips, techniques, and workouts, as well as gain access to a private Facebook group–a group where–*gasp*–you could even post your own video for critique! (Or, if that makes you nauseous, at least check out the feedback on the videos of other brave(r) souls!)
For now, though, no kettlebells needed!
This is your…
5-Minute Sweaty
Your best bet is to set a timer to ding every 10s, and just keep track of how many dings you’re working through.
20s high-knees
10s plank hold
20s tuck jumps
20s plank hold
20s plyo lunges
30s plank hold
20s high-knees
10s plank hold
20s tuck jumps
20s plank hold
20s plyo lunges
30s plank hold
Max. 60s push-ups to burn out
Stronger Every Day,
Alyssa
P.S. Perfect your swing (and every other kettlebell basic) by clicking here to join Pat’s email list!
PPS – Check out this cool post on Man Vs Weight going over 111 more Kettlebell Exercises.
